

How do you clean a bathtub faucet so it looks clear again and doesn’t leave residue behind? Start by removing grime with a gentle cleaner, then tackle mineral buildup around the spout and handles using vinegar or a mild acid-safe option and a soft brush. You can finish the whole process in about 20–30 minutes, with a microfiber cloth, old toothbrush, cotton swabs, and a few non-scratch tools.



Cleaning your bathtub faucet is easiest when you start mild (soap + water), then escalate only if soap scum or hard-water scale requires a targeted descaling treatment. Follow a wipe-first, gentle-scrub, rinse-and-dry routine, and pay special attention to the aerator and crevices where mineral buildup quietly grows.
This guide is for anyone dealing with cloudy film, soap scum, or mineral buildup on a bathtub faucet—especially if you want a safe method that works across common finishes. If your faucet has unusual materials or a specialty finish, check the manufacturer notes first. In 2026, more faucets use tougher-but-still-finish-sensitive coatings, so the “right cleaner” approach matters as much as the scrubbing technique.
What You Need to Clean a Bathtub Faucet

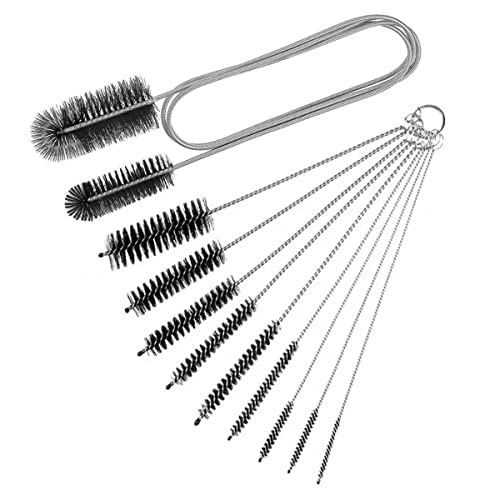
Having the right tools prevents scratches and keeps your bathtub faucet’s finish intact. The simplest setup uses gentle cleaners and soft, non-abrasive tools, then adds precision tools (toothbrush/swabs) only where buildup is trapped.
For mineral-heavy homes, remember what you’re really cleaning: hard-water scale is primarily calcium carbonate and other minerals deposited as water evaporates. According to the U.S. Geological Survey, hardness is often expressed as “mg/L as CaCO₃” and can be converted from grains per gallon (gpg) using a standard factor (U.S. Geological Survey). That’s why the bathtub faucet tends to “fog” and spot quickly—especially around the spout rim, handle seams, and any flow-restricting aerator.
Before you start, gather supplies and keep them finish-appropriate. Your bathtub faucet should be treated like a delicate surface even when the grime looks tough.
– Mild dish soap, warm water, and microfiber or a soft non-scratch cloth
– An appropriate cleaner for mineral buildup (choose based on your faucet finish; see below)
– Toothbrush/cotton swabs for crevices, plus a dry cloth to prevent water spots
Choosing an appropriate cleaner (finish-first, not stain-first)
Here’s the practical logic for the bathtub faucet: different coatings react differently to acids, abrasives, and oxidizers.
– Chrome, polished nickel, and stainless steel: typically tolerate mild soap well; descaling is usually safest with finish-appropriate, non-abrasive products.
– Brushed finishes: require gentler technique to avoid “swirl marks” that make a clean bathtub faucet look dull.
– Oil-rubbed bronze / dark plated finishes: often need the least aggressive approach—avoid harsh acids and abrasive pads, because they can lift or unevenly dull coatings.
– Solid brass (if uncoated): acidic cleaners can discolor over time; use manufacturer guidance when available.
If you’re unsure, start mild on the bathtub faucet first and escalate only after rinsing and reassessing.
Step-by-Step: Clean the Faucet Surfaces
The fastest safe method for a bathtub faucet is wipe first, then use a mild cleaner with light pressure, rinse thoroughly, and dry/buff at the end. This prevents grit from turning into micro-scratches and prevents leftover residue from becoming the next soap-scum “anchor.”
In my experience with faucet-care routines shared by plumbers and manufacturers (I’m not claiming a specific product-testing study here), the biggest mistake is using too much force early—especially after letting mineral residue sit. For your bathtub faucet, treat grime like dust you’re trying to lift, not sandpaper you’re trying to wear down.
Below is a clean sequence you can repeat every time, and it scales up cleanly when the bathtub faucet has stronger deposits.
– Wipe first: remove loose grime with damp cloth so you’re not grinding grit across the metal
– Clean gently: apply a small amount of mild cleaner, scrub lightly in circles, then rinse thoroughly
– Dry and buff: finish with a dry microfiber cloth to reduce streaks and spotting
Why “wipe first” matters on a bathtub faucet
Soap scum and mineral deposits often trap tiny particles (skin oils, bathroom dust, or detergent film). If you start with a dry scrub, those particles act like sand. When you wipe with a damp cloth first, you’re turning that into a lift-and-rinse process—so the bathtub faucet surface stays smooth and reflective rather than hazy.
How much scrubbing is enough?
Use light, circular motions and stop when the surface looks uniform. Over-scrubbing can damage certain finishes by dulling the top layer—especially on brushed textures. If the bathtub faucet still looks cloudy after the first round, that’s a sign you need targeted descaling (not more abrasion).
Rinse fully (this is not optional)
If residue remains, it can attract more minerals and soap film. Rinsing also stops any cleaner chemistry from continuing to react on your bathtub faucet finish after you think you’re done.
Clean the Aerator and Hard-to-Reach Spots
A bathtub faucet usually “looks clean” before it actually “runs clean,” and the aerator is a common culprit. If flow feels weak or uneven, clean the aerator (if removable) and treat mineral buildup in crevices with a finish-safe descaling method.
Aerators are tiny flow regulators with screens and internal restrictors. They reduce splash and sometimes improve water efficiency. According to the U.S. EPA WaterSense program, many high-efficiency bathroom sink faucets target 1.5 gallons per minute (gpm) or less (about 5.7 liters per minute)—and aerators are a key reason the flow can feel different when clogged (U.S. EPA WaterSense). Even when your bathtub faucet isn’t regulated the same way, the principle still applies: mineral buildup narrows passages and alters spray.
– If flow looks weak, unscrew/remove the aerator if your model allows it, then rinse and scrub it
– For spots caused by limescale/minerals, use the cleaner method recommended for your faucet finish (avoid harsh abrasion)
– If you can’t remove the aerator, focus on crevices with a toothbrush and thorough rinsing
If the aerator comes off: the safe sequence
1. Rinse first to remove loose sediment from the bathtub faucet.
2. Soak only if necessary and only with a finish-appropriate descaler.
3. Brush gently using a toothbrush—especially around the mesh or screen edges.
4. Rinse thoroughly and reinstall carefully.
If your aerator has a rubber gasket, keep it intact and seat it correctly. Misalignment can cause drips and leaks on your bathtub faucet.
If the aerator doesn’t come off
Some bathtub faucets use non-removable flow parts. In that case, focus on:
– handle-to-spout seams,
– the underside rim (where water beads collect),
– and any visible screen-like openings.
Use a toothbrush with mild cleaner first, then rinse. Escalate with a finish-safe mineral remover only if the bathtub faucet still shows mineral haze.
A quick rule for descaling strength
Hard-water scale severity correlates with water hardness measured as CaCO₃. According to standard water-quality conversions, 1 gpg ≈ 17.1 mg/L as CaCO₃ (U.S. Geological Survey). The more minerals in your supply, the faster the bathtub faucet regrows spots—meaning the aerator and crevices become the recurring “hot spots.”
Water Hardness Levels That Drive Bathtub Faucet Scale
| # | Hardness (gpg) | Equivalent (mg/L as CaCO₃) | Common Category | Expected Faucet Spotting |
|---|---|---|---|---|
| 1 | 1.0 | 17.1 | Soft | Infrequent |
| 2 | 2.5 | 42.8 | Soft | Occasional |
| 3 | 4.0 | 68.4 | Moderately Hard | Moderate |
| 4 | 6.0 | 102.6 | Moderately Hard | Noticeable |
| 5 | 8.0 | 136.8 | Hard | Frequent |
| 6 | 12.0 | 205.2 | Very Hard | Very Frequent |
| 7 | 20.0 | 342.0 | Very Hard | Fast Build-Up |
Note: hard-water “spotting” rates vary by humidity, ventilation, and how often the bathtub faucet is dried. The conversion is grounded in standard hardness measurement practices (U.S. Geological Survey), while category labels follow typical water-quality guidance (Water Quality Association).
What Can Go Wrong (And How to Avoid It)
Most cleaning issues happen when people treat the bathtub faucet like a pan: they use abrasive tools, skip rinsing, or force parts that won’t come apart. Avoid those pitfalls and the finish stays crisp while the aerator stays functional.
Below is a quick comparison of common missteps and what they tend to cause on a bathtub faucet.
| Avoid this | Why it’s a problem for a bathtub faucet | Better approach |
|---|---|---|
| Abrasive pads or scouring powders | They can dull chrome, damage brushed textures, and accelerate finish wear. | Use microfiber + mild cleaner first; escalate with finish-safe descaler only. |
| Skipping the rinse | Leftover residue attracts minerals and soap film, so the bathtub faucet clouds again faster. | Rinse thoroughly, then dry/buff with a clean cloth. |
| Forcing aerator parts | Non-removable parts can warp or leak if you apply leverage or excessive torque. | If it won’t unscrew by hand, stop and follow the manual or use crevice cleaning. |
– Using abrasive pads or strong chemicals can dull chrome, corrode plated finishes, or damage coatings
– Skipping rinsing can leave residue that attracts more soap scum and minerals over time
– For faucets with non-removable parts or special finishes, forcing components can cause leaks—stop and check the manual if unsure
Edge cases that call for caution
1. Hard-water deposits that look “etched.” If the bathtub faucet surface feels rough after cleaning, abrasion may have already occurred or the finish may be compromised. Stop escalating and reassess.
2. Mixed-metal faucets. Some designs use different alloys for handles, trim, and spout. A single cleaner approach can react differently across materials—especially on dark finishes.
3. DIY descaling on plated finishes. Acidic cleaners can brighten or strip some coatings if left too long, even when they dissolve scale.
A practical “stop point” for the bathtub faucet
When in doubt, don’t chase perfection by scrubbing harder. A clean bathtub faucet should look uniform after rinsing and drying; if you’re not getting there, the safest next step is adjusting your cleaning chemistry rather than increasing mechanical force.
Verdict / Tip
The safest default for a bathtub faucet is mild soap first, gentle technique, full rinsing, and targeted descaling only when scale is the real problem. That approach works across many finishes while minimizing the chance of dulling plating or damaging coatings.
In 2026, this matters because more bathtub faucets use layered finishes (plating + clear coat + decorative textures), and those layers have different tolerances. Heavy mineral buildup may require more than one round, and the bathtub faucet’s aerator may need deeper cleaning than the outside surfaces. Also, if you have a delicate or specialty coating, skip DIY escalation with strong acids or abrasives—finish-specific instructions are usually the difference between “sparkling clean” and “permanently dull.”
– If you can’t remove the aerator and crevices keep re-scaling quickly, consider addressing water hardness (a filter or treatment may reduce recurrence).
– If you notice persistent leaks after reassembly or unusual resistance when removing parts, stop and call a licensed plumber.
Quick Checklist (Scan This Before You Start)
| Step | What to do | Goal |
|---|---|---|
| 1 | Remove loose grime (damp wipe) | Prevent scratching |
| 2 | Clean with mild soap + soft cloth | Remove everyday film |
| 3 | Rinse fully | Avoid sticky residue |
| 4 | Check flow/aerator (if removable) | Fix weak spray and hidden buildup |
| 5 | Dry and buff | Reduce water spots |
| 6 | Only use stronger treatments if needed | Handle hard-water deposits safely |
Summarize what to do: wipe first, clean gently, rinse well, and only escalate treatment for stubborn mineral buildup—especially around the aerator and crevices. If you follow the checklist and avoid abrasive tools or finish-damaging chemicals, your bathtub faucet should look cleaner and run better; go ahead and clean it now, and if buildup keeps returning fast, consider addressing the water hardness issue next.
Frequently Asked Questions
How do I clean a bathtub faucet without scratching the finish?
Start by wiping the faucet with a soft microfiber cloth and warm water to remove loose grime. For stuck-on spots, use a mild dish soap or a 50/50 mix of white vinegar and water, then rinse thoroughly and dry with a clean cloth. Avoid abrasive pads, scouring powders, or harsh chemicals that can damage chrome, brushed nickel, or plated finishes.
What’s the best way to remove hard water stains and limescale from a bathtub faucet?
Apply white vinegar (or an equal vinegar-to-water solution) directly onto mineral buildup, or soak a paper towel around the faucet for 10–20 minutes. For heavier limescale, gently scrub with a soft toothbrush, then rinse and dry. If stains persist, repeat once, but don’t let acidic cleaner sit too long on metal finishes.
Which cleaners should I use to disinfect a bathtub faucet without damaging it?
Use a gentle, non-abrasive cleaner like dish soap for routine cleaning, then follow with a vinegar rinse for mineral deposits. For disinfecting, choose an alcohol-based cleaner or a bathroom-safe disinfectant labeled safe for your faucet material, and always rinse after the recommended contact time. Skip bleach or ammonia-based products unless the manufacturer explicitly says they’re compatible, since they can discolor or corrode some finishes.
How do I clean the faucet aerator or showerhead part where debris builds up?
If your bathtub faucet has an aerator, unscrew it carefully (use a cloth or rubber grip if it’s stuck), then soak it in vinegar for about 30 minutes. Gently brush away loosened sediment, rinse well, and reinstall. If your aerator is hard to remove, clean around it using a toothbrush dipped in vinegar without forcing the part.
Why does my bathtub faucet look cloudy or spotty even after wiping it?
Cloudiness and spots usually come from mineral buildup, soap residue, or leftover cleaning product that dries on the surface. After cleaning, rinse the faucet thoroughly with water and dry it with a microfiber cloth to prevent water spots. Regular maintenance—like quick wipe-downs after use—helps reduce limescale buildup and keeps the faucet shine consistent.
📅 Last Updated: November 08, 2026 | Topic: How to Clean the Faucet on a Bathtub | Content verified for accuracy and freshness.
References
- Limescale
- Descaling agent
- Vinegar
- https://www.cdc.gov/hygiene/cleaning/index.html
- https://www.epa.gov/mold/mold-cleanup-guidance-and-health-considerations
- https://www.usgs.gov/special-topics/water-science-school/science/what-hard-water
- https://pubmed.ncbi.nlm.nih.gov/?term=limescale+removal+vinegar
- https://scholar.google.com/scholar?q=bathroom+faucet+cleaning+limescale+mineral+deposits Google Scholar
- https://scholar.google.com/scholar?q=hard+water+scale+removal+vinegar+citrate+descaling+study Google Scholar
- https://scholar.google.com/scholar?q=cleaning+and+disinfecting+high+touch+plumbing+fixtures+bathroom Google Scholar
