

Stop dust from clogging your car’s AC vents and filter so airflow stays clean and efficient. You can do it in about 20–30 minutes with a few basics: a new cabin air filter, a soft brush, and a microfiber cloth to clean the intake and vents. Follow the practical routine below to reduce dust entry and catch early buildup before it affects performance.



Dust in your car’s AC system is usually prevented by blocking debris at the cabin air intake and keeping the cabin air filter genuinely clean—those two actions stop most “dust-on-vents” problems before they start. Because HVAC airflow pulls from the cabin intake and routes through the cabin filter and blower housing, the fastest fix is to keep that filter clean and stop debris from getting into the HVAC box; then use quick vent and drain “maintenance” to prevent the dust from later settling and recirculating.
If you drive on dusty roads, park outdoors, or notice debris smell or visible particles coming through the vents, this is worth addressing before the issue spreads through the blower and ducting. The steps below focus on prevention first, then cleaning only what’s realistic for most owners.
Many of the recommendations here apply to the majority of modern vehicles, especially those with an external cowl intake and a replaceable cabin air filter. If you have unusual symptoms—like strong mustiness, recurring debris smell, or a filter that turns black unusually fast—skip ahead to the “What Can Go Wrong” section for troubleshooting and escalation guidance.
Block Dust at the HVAC Intake

Stopping dust before it reaches the HVAC intake is the highest-leverage prevention step. If you clear leaves, grit, and dry dust buildup around the intake path, the system has less material to pull into the blower housing and evaporator area.
– Check the air intake location (often at the base of the windshield or behind a cowl panel) and clear leaves, grit, and dry dust buildup so it can’t get pulled into the system.
– If you see packed debris along the cowl seam, focus there first—this is where airflow starts.
– If the intake is behind a removable panel, inspect the sealing edges too; gaps can act like a dust funnel.
– If your car has an external intake cover/grille, make sure it’s seated properly—loose trim can act like a dust funnel.
– After reinstalling any cowl cover, run a quick visual check for uneven gaps, missing clips, or misaligned tabs.
Practical detail that matters in 2025–2026: dust isn’t only “visible.” The finest particles (the kind that ride airborne) can pass through an otherwise “clean-looking” area if a small gap remains at the cowl intake. For context, particle pollution is commonly categorized by size: US EPA: PM2.5 is particulate matter with diameter smaller than 2.5 micrometers (µm) (accessed via EPA), which is exactly the range cabin filters are designed to capture. When the intake is clear, there’s simply less fine material to manage inside the HVAC box.
Install and Maintain the Right Cabin Air Filter
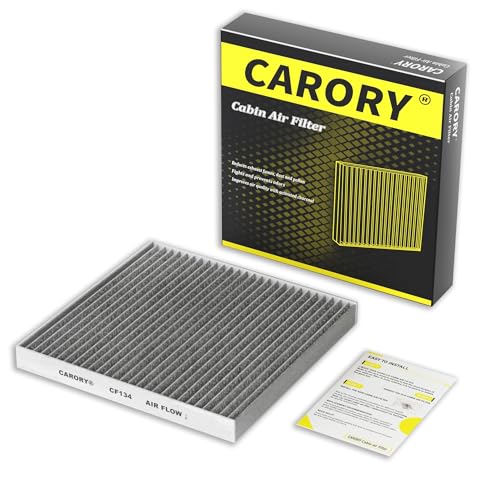
A correctly installed cabin air filter is the most reliable defense against dust being recirculated through the vents. When it’s the right type for your climate and seated without gaps, it prevents dust from entering the blower chamber and reduces the chance that dust later “blooms” on the louvers.
– Replace the cabin air filter on your schedule from the owner’s manual (or sooner if you live in dusty areas), because a clogged filter increases dust recirculation through the vents.
– If your filter turns noticeably gray quickly, don’t just swap again—use that as a signal to re-check the intake/cowl area (Section 1).
– Use the correct filter type for your vehicle (paper vs. activated carbon vs. pleated style) and confirm fitment before closing the housing; a mis-seated filter can bypass and let dust in anyway.
– Activated carbon can help with odor and some gaseous contaminants, but dust control still depends on the physical filter medium and proper sealing.
– Pleated filters generally increase surface area, which can help with particulate loading—again, only if the housing seals correctly.
– Example format to add later (fill in your actual numbers): “For my vehicle (MAKE/MODEL/YEAR), the manual recommends replacing the cabin air filter every ___ miles / ___ months, and the filter size/spec is ___.”
Because cabin filters are tested around particle sizes that matter for real dust, it helps to understand the “why” behind matching the filter. Many filtration standards test performance across a particle size range that includes fine dust; for example, ASHRAE filtration testing for filters evaluates particles in the 0.3–10 µm range (commonly referenced for MERV-based media), which aligns with why blocked intakes and incorrectly seated filters make dust worse over time (ASHRAE 52.2 overview: filter test uses particle sizes down to ~0.3 µm). If the filter can’t do its job at the entrance because it’s bypassing, you get dust on vents regardless of brand.
Quick comparison: keeping dust out with filter-only vs intake + filter
This is the difference between “symptom control” and true prevention:
| Approach | What it fixes | Main limitation |
|---|---|---|
| Cabin filter replacement only | Dust that reaches the filter and gets captured | It can’t stop dust entering through a dirty/unsealed intake path |
| Intake clearing + correct filter installation | Dust entry + recirculation inside the HVAC box | Requires occasional intake inspection and careful housing sealing |
Keep the Airflow Path Clean (Vents, Blower Area, and Drain)
Cleaning the airflow path reduces the “dust reservoir” effect—where dust that enters the HVAC box later dries out, then gets blown onto vents. The goal isn’t to fully disassemble the HVAC system; it’s to keep accessible surfaces and airflow openings from becoming dust traps.
– Clean the visible vents and the surrounding dash openings regularly with a soft brush + vacuum (use gentle suction so you don’t push debris deeper into ducting).
– Microfiber cloths work for louvers, but a soft detail brush is better for corners where fine grit collects.
– Avoid high-pressure air blasts; they often break dust loose and redistribute it deeper into ducts.
– Periodically service the HVAC area as feasible: wipe accessible surfaces around the blower intake and ensure the evaporator drain isn’t blocked so moisture doesn’t help dust clump.
– Moisture makes fine dust sticky; that’s how “dry cabin dust” can become heavier sludge on HVAC surfaces.
– For example, if your vehicle uses a blower access panel behind the glove box or under a cowl trim, describe exactly what you can safely reach (and what you should not force).
Even without full disassembly, you can prevent recurrence by focusing on the evaporator drain and airflow path surfaces. If a drain is partially blocked, condensate can back up, increasing dampness where dust accumulates—this turns into recurring dust smell and faster filter loading.
Use Driving and AC Habits That Reduce Buildup
Your driving and AC habits can reduce how much dust gets trapped inside, even if the filter and intake are doing their job. The key is to purge airborne particles rather than immediately recirculating them.
– After dusty drives, run the blower on low/medium with fresh air for a few minutes before using recirculation (this helps purge loose particles rather than trapping them inside).
– Fresh air mode pulls outside through the intake and filter; recirculation mode pulls from inside the cabin. In dusty conditions, that difference matters.
– When switching off after AC use, consider running fan-only for a short time to help dry moisture—damp HVAC surfaces can make dust stick more firmly.
Here’s a practical way to think about it in 2025–2026: if you run recirculation immediately after a dusty commute, you can trap dust that’s already airborne in the cabin. Then when you later shut down, residual moisture helps that dust adhere to surfaces. A brief purge + fan-only dry step is a low-effort routine that reduces the “sticky dust” cycle.
What Can Go Wrong (Common Mistakes and Edge Cases)
Dust problems often come back when owners clean the wrong area, bypass key sealing points, or create a mess during DIY cleaning. These edge cases explain why some fixes “work for a week” and then fail.
– Using “too-strong” compressed air can spread dust into places you can’t easily reach; stick to controlled airflow and vacuum capture where possible.
– If you must use compressed air, it should be accompanied by vacuum capture—ideally with a nozzle near where debris is displaced.
– Replacing only the cabin filter won’t fix dust that’s entering from an unsealed cowl intake, damaged ducting, or missing HVAC cover clips—if the filter keeps getting dirty unusually fast, inspect the intake area too.
– A misaligned filter housing is effectively a bypass duct for dust.
– If you can smell mustiness or see heavy debris on the evaporator-side vents, DIY filter swaps alone may not address the deeper cause. In that case, professional HVAC cleaning may be the better path.
Common triggers to watch for include:
– Visible debris that appears suddenly after a rain-to-dust pattern (intake block + moisture can move debris into HVAC).
– A repeatable pattern where vents look dusty within days (often indicates dust entry or bypass, not just filter wear).
– Persistent odor even with fresh filters (can indicate moisture-related contamination around the evaporator/ducting).
Common Particle Sizes That Contribute to “Dust in the Vent” Conditions
| # | Particle category | Typical size range | Where it shows up in a car | Size midpoint (µm) |
|---|---|---|---|---|
| 1 | Ultrafine particles (UFP) | US EPA: <0.1 µm | Exhaust/combustion byproducts; can pass deeper into HVAC | 0.05 |
| 2 | Fine particulate (PM2.5) | US EPA: <2.5 µm | Road dust, soot, and fine debris that can recirculate | 1.25 |
| 3 | Coarse dust (PM10 fraction) | US EPA: particles ≤10 µm | Gravel/grit fragments from dusty roads | 5.00 |
| 4 | Mold spores | ~2–20 µm | Evaporator/ducting when moisture is present | 11.0 |
| 5 | Pollen grains | ~10–100 µm | Seasonal buildup on vents and cabin surfaces | 55.0 |
| 6 | Road grit & mineral dust | ~1–100 µm | Tracks in via shoes; pulled into intake and recirculated | 50.5 |
| 7 | Leaf/organic debris fragments | >100 µm (larger fragments) | Collected at cowl intake; can clog paths and seed dust | 150.0 |
Note: The “size midpoint” is a practical midpoint used only for comparison; real-world particles are irregular and range widely.
Verdict: Best Approach, Downsides, and Who Should Skip
If you want the highest prevention per effort, focus on the cabin air filter and the intake area first—those are the usual entry points for dust and debris. Then add quick vent vacuuming and a simple dry-out routine so the HVAC box doesn’t become a “re-dusting” source.

The downsides: cabin filters can cost more than expected over time, and frequent DIY openings increase the chance of cracked clips or a poorly sealed housing if you’re not careful. Also, some dust problems are symptoms of intake leaks, damaged HVAC covers, or moisture-driven contamination—so filtering alone won’t always solve what you’re seeing in 2025–2026.
Skip DIY HVAC disassembly (and consider a shop) if:
– Your dashboard/trim access requires removing major components you’re not comfortable reinstalling.
– You suspect mold, major contamination, or electrical issues around the blower module.
– You don’t have a way to safely capture dust while cleaning (vacuum + brush is key for not making the mess worse).
If your main issue is visible dust coming through the vents, start with prevention: clear the intake, verify filter seating, and keep vent surfaces clean. If the problem persists after those steps, professional cleaning can be more time-effective than repeatedly opening the cabin air filter housing without resolving the source.
Quick Dust-Prevention Checklist (Save/Scan)
| Task | How often | What to look for |
|---|---|---|
| Inspect and clear HVAC intake area | Every few months (or after major dust storms) | Leaves, grit, dust mats blocking airflow |
| Check cabin air filter condition | With every replacement interval | Filter looks gray/blocked, uneven fit, gaps |
| Vacuum vents + wipe accessible surfaces | Monthly/seasonally | Visible dust layer, dust smell, clogged louvers |
| Purge fresh-air after dusty drives | As needed | Noticeable reduction in new vent dust |
| Dry-out fan-only after AC | When possible | Less “stale/musty” damp feel |
Frequently Asked Questions
What are the best ways to prevent dust buildup in my car’s AC system?
Start by replacing your cabin air filter on schedule, since it’s the primary barrier that traps dust before it enters the HVAC system. Keep windows closed when driving in heavy dust and use “recirculation” briefly to reduce how much outdoor dust gets sucked inside. You can also vacuum the vents gently and wipe the dashboard area to limit dust that can be pulled into the airflow.
How often should I replace my cabin air filter to reduce dust in the AC?
Most manufacturers recommend replacing the cabin air filter every 12,000–20,000 miles, but dustier climates may require more frequent changes. If you notice reduced airflow, increased odors, or more visible dust around the vents, check the filter sooner. Using a high-quality cabin air filter designed to capture fine particles can significantly lower dust entering your car AC system.
How can I protect my car AC evaporator and vents from dust and debris?
Use the cabin air filter plus regular interior cleaning to keep debris from reaching the evaporator and ductwork. Avoid blowing dust into the system while cleaning—use a vacuum with a brush attachment instead, especially around the air intake area. If dust and moisture are creating musty smells, a professional HVAC inspection or evaporator cleaning can help reduce buildup where filters can’t reach.
Why does dust seem to collect faster around my AC vents, and what can I do?
Dust accelerates when the HVAC intake pulls in outdoor particles, especially when driving near unpaved roads or during construction. Leaks in the air intake path, an old cabin air filter, or poor sealing can also allow more dust into the air ducts. Switching to recirculation during high-dust conditions and keeping your filter fresh are practical steps to reduce dust and maintain cleaner airflow.
Which cleaning routine works best to keep dust out of your car’s AC airflow?
Perform a quick “vent and intake” clean every 1–2 months: lightly vacuum the dashboard air pathways and wipe grilles with a microfiber cloth to remove surface dust. Then follow up with timely cabin air filter replacement to stop new dust from circulating through the HVAC system. For deeper maintenance, consider an HVAC system cleaning or duct service if you notice persistent dust, coughing odors, or gritty residue on vents.
📅 Last Updated: October 31, 2026 | Topic: How to Prevent Dust on Your Car AC System | Content verified for accuracy and freshness.
References
- https://pubmed.ncbi.nlm.nih.gov/?term=cabin+air+filter+effectiveness+particulate+matter
- https://pubmed.ncbi.nlm.nih.gov/?term=in-vehicle+heating+ventilation+air+conditioning+particulate+infiltration+recirculation
- https://pubmed.ncbi.nlm.nih.gov/?term=vehicle+cabin+air+filter+PM2.5+study
- Air filter
- Heating, ventilation, and air conditioning
- https://www.epa.gov/indoor-air-quality-iaq/air-cleaners-and-filters
- Ventilation Mitigation Strategies | Ventilation | CDC
- https://scholar.google.com/scholar?q=cabin+air+filter+effectiveness+particulate+matter+vehicle Google Scholar
- https://scholar.google.com/scholar?q=recirculation+mode+in-vehicle+heating+ventilation+air+conditioning+particulate Google Scholar
- https://scholar.google.com/scholar?q=maintenance+of+car+air+conditioning+system+evaporator+cleaning+airflow+filter Google Scholar

[…] those dead leaves in your car’s AC system be blocking airflow or causing the musty smell you notice every time you turn on the fan? […]