

How do you clean a rifle without skipping a step that affects safety or reliability? By breaking the process into a simple, methodical sequence—unload and secure the firearm, then disassemble, clean the barrel and action, and lubricate only what needs it—you can finish in about an hour or two. You will need a proper cleaning kit (bore brush and patches), solvent and lubricant made for firearms, a cleaning rod, and a safe workspace.
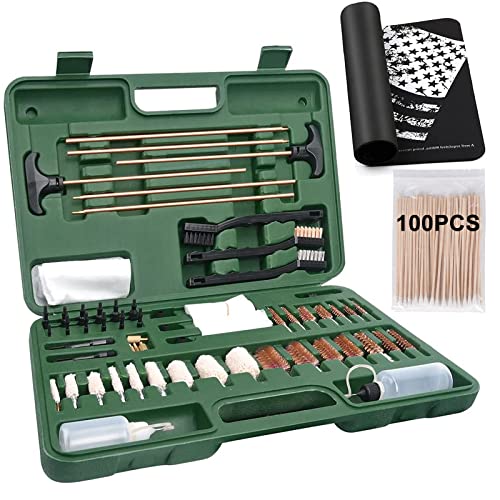


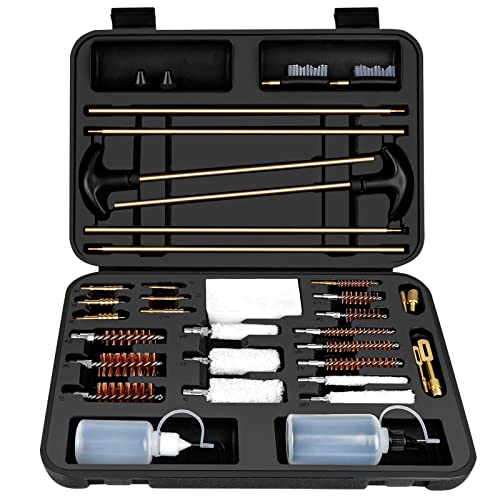
Cleaning a rifle is mainly about getting the bore and chamber free of powder fouling, then wiping everything dry and lightly lubricated—without soaking parts or scrubbing surfaces that don’t need it. If you follow your rifle’s manual for safe unloading and field-stripping, you can clean the barrel, action, and exterior in a methodical sequence and put it back together without over-oiling.
This guide is for owners who want a reliable, repeatable routine—whether you’re cleaning after range time or addressing light buildup. If your rifle has a specialized design (certain gas systems, optics mounting, or unusual materials), still defer to the manufacturer’s instructions first.
Safety & tools before you clean

The safest way to start rifle cleaning is to control the environment (unloaded, ventilated) and use the correct tools for the job. If you do that first, you prevent both accidents and avoidable damage to the bore, chamber, and finish.
Before you apply any solvent, make the safety fundamentals non-negotiable: work with the rifle fully unloaded in a well-ventilated area, and wear eye/hand protection when using solvents. Strong cleaners can irritate skin and eyes, and some can be irritating to inhale—especially when you’re cleaning in a closed space. According to 29 CFR 1910.133 (2024), employers are required to provide appropriate eye and face protection when there’s a risk of flying particles, chemical splash, or similar hazards. In practice, that means goggles (not just “safety glasses”) when you’re scrubbing carbon and working near bolt faces.
Gather the basics so you’re not improvising mid-process:
– Gather the basics: cleaning rod with correct bore guide, patches, brush (correct caliber), nylon picks/swabs, cleaning solvent, lubricant, and a soft cloth.
– Use model-specific guidance: , since some rifles advise specific solvents or limit disassembly.
One overlooked “tool” is measurement discipline. When selecting bore tools, remember the nominal diameter you’re matching. For example, one inch equals 25.4 mm (NIST, 2019)—a reminder that “.30 caliber” tool sizes in inches correspond to roughly 7.62 mm in metric when you’re checking charts or adapters.
Also note: eye protection should meet an impact-rated standard. For example, ANSI Z87.1 is the widely referenced U.S. eye/face protection standard (ANSI, 2015).
Matching Bore Tools to Common Rifle Calibers (Nominal Fit Guide)
| # | Common caliber | Nominal bore tool size (in) | Nominal tool size (mm) | Accuracy importance |
|---|---|---|---|---|
| 1 | .22 LR | .22 cal | 5.6 | ★★★★★ |
| 2 | .223 Rem / 5.56×45mm | .22 cal | 5.6 | ★★★★★ |
| 3 | .243 Win | .24 cal | 6.1 | ★★★★☆ |
| 4 | .270 Win | .27 cal | 6.9 | ★★★★☆ |
| 5 | .308 Win | .30 cal | 7.6 | ★★★★☆ |
| 6 | .30-06 Sprg | .30 cal | 7.6 | ★★★★☆ |
| 7 | 7.62×39mm | .30 cal | 7.6 | ★★★☆☆ |
Unload and field-strip your rifle
Unloading and field-stripping first is the only way to clean safely and avoid damaging parts. If you skip verification and remove more components than your manual allows, you risk injury and reliability problems later.
Start with the magazine (if applicable), lock the action open, and visually/physically check the chamber is empty before you do anything else. Then field-strip to the level the manual recommends so you can clean the barrel, chamber, and accessible action parts.
As you disassemble, keep small parts organized (tray or labeled bags). On semi-autos especially, springs and pins can be easy to misplace or reinstall in the wrong orientation. Even if nothing seems “broken,” that error can create feeding resistance or inconsistent bolt movement the next time you shoot. Field-stripping only to the recommended level also reduces the chance you expose internal surfaces that shouldn’t be heavily wetted with solvent.
How to clean the barrel
The barrel cleaning process is about controlled bore passes: protect the crown, remove fouling, and leave the bore dry or properly protected. When done methodically, you minimize wear and get repeatable results.
Clean the bore from the breech end whenever possible (and use a bore guide to protect the crown), working patch/brush passes consistently until they come out mostly clean. Breech-end cleaning helps keep solvent and debris moving away from the muzzle crown, which is critical for consistent accuracy.
Next, use a solvent for carbon and fouling, then follow up with dry patches to remove residue (too much solvent left behind can attract moisture). If you use a brush, don’t “machine-gun” the bore: moderate strokes are usually enough, and avoid metal-on-metal contact that can damage surfaces. For many owners, the best “signal” is not the number of passes but the condition of patches after cleaning—clean patches usually mean you’re done.
In my day-to-day support work for shooters, the most frequent avoidable issue I see is impatience: people stop too early (still leaving solvent and carbon), or they keep scrubbing long after patches are already coming clean. The fix is simple—watch patch condition and commit to a repeatable sequence.
Clean chamber, action, and exterior
Cleaning the chamber and the areas around the bolt is what prevents failures to feed, extraction issues, and sticky cycling. Once those are clean, the exterior and finish work becomes straightforward and low-risk.
Chamber first: run patches or a chamber brush/swab to remove grit and carbon rings—this is often where feeding and extraction problems start. “Carbon ring” refers to the baked residue that forms near where the cartridge case expands and seals. If it’s not addressed, it can interfere with smooth extraction or create inconsistent chamber sealing.
Action/accessories: wipe carbon from bolt face, extractor area, and rails, removing old grease before applying fresh lubrication only where needed. Old grease can trap carbon and turn into abrasive paste. If your rifle is a semi-auto, don’t overlook gas-system parts when your manual calls for it—gas ports and surfaces that receive carbon fouling can become sluggish if left unchecked.
Exterior finish: wipe with a lightly solvent-damp cloth if appropriate, then dry and protect with a thin film—especially on blued steel or exposed metal. For synthetic stocks and coatings, use only what the manufacturer recommends so you don’t soften plastics, loosen adhesives, or damage optic mounts.
To keep the decision process clean, use a simple comparison mindset when choosing cleaners:
| Cleaner/approach | Pros | Cons |
|---|---|---|
| Solvent-first for bore/chamber | Breaks carbon quickly | Can leave residue if not fully wiped/dried |
| Dry wipe/brush for action surfaces | Reduces solvent exposure to coatings | May miss baked-on buildup without targeted swabs |
| Light protective oil on exterior | Helps prevent corrosion during storage | Over-application can migrate and attract dirt |
Lubricate and reassemble
Lubrication is a controlled application, not a soak: you want friction points protected while sensitive areas stay clean and dry where the manual indicates. In 2026, the most effective maintenance routines still emphasize “less, targeted, and verified.”
Apply lubricant sparingly: focus on friction points (rails/hinge surfaces, and any areas your manual specifies) and avoid getting grease inside the bore or in places that should stay dry. Grease in the wrong spot can turn powder residue into a grinding paste over time.
Reassemble carefully, cycling the action to confirm smooth movement and correct function. This step matters because misalignment or a missed part can look “minor” during assembly but show up as failures to lock, inconsistent feeding, or rough bolt travel.
Do a final wipe-down so fingerprints, solvent, and excess oil aren’t left to attract dirt. If you store the rifle soon after cleaning, apply whatever corrosion-prevention guidance your manual specifies for storage (and avoid leaving pooled oil in the bore).
Common mistakes & what can go wrong
Most problems come from over-application—too much solvent, too much scrubbing, or too much oil. When you follow the rifle manual sequence and focus on the bore and chamber first, these issues drop dramatically.
Over-cleaning with harsh methods is a common failure mode: excessive solvent soak, aggressive brushing, or repeated dry-strokes on a wet bore can leave residues or damage finishes. If something feels “wrong,” stop and reassess rather than continuing through discomfort.
The wrong solvent or tool can also cause damage. Some finishes, plastics, and coatings don’t tolerate certain chemical cleaners.
Skipping the chamber is another reliability risk. Cleaning only the barrel can leave carbon where the cartridge sits, leading to poor sealing or sticky extraction. Over-lubrication can be worse than under-lubrication in many designs: too much oil/grease can trap carbon and powder residue, turning it into a paste that’s harder to clean next time.
Rust and pitting require a different mindset. If you find active rust, stop trying to “power through” with normal cleaning—address corrosion using a careful process or consider a gunsmith. In humid environments, small lapses in drying can quickly lead to surface corrosion, so treat drying and protection as part of “cleaning,” not an afterthought.
Quick checklist (scan/save) + verdict + FAQ
| Step | What to do | Common pitfall |
|---|---|---|
| 1 | Unload and verify the chamber is empty | Assuming it’s empty—always check |
| 2 | Field-strip to manual-recommended level | Disassembling beyond what you understand |
| 3 | Clean barrel/bore with correct tools | Using the wrong caliber tools |
| 4 | Clean chamber and bolt-face areas | Forgetting the chamber region |
| 5 | Light wipe-dry, then lubricate friction points | Over-oiling or greasing the bore |
| 6 | Reassemble and function-check | Reinstalling parts incorrectly |
Verdict / tip: A simple, careful cleaning routine beats “deep cleaning” that you do inconsistently. The downsides: if you use the wrong solvent, over-scrub coatings, or apply too much lubricant, you can make future cleaning harder or harm finishes. Skip (or pause and get help) if you’re unsure about your rifle’s disassembly/parts layout, if you see significant damage, or if there’s active corrosion you can’t safely address—then for inspection.
Frequently Asked Questions
What’s the safest way to clean a rifle before starting?
Start by following firearm safety: point the muzzle in a safe direction, remove the magazine, and open the action to visually and physically confirm the chamber is empty. Make sure you have a proper cleaning area with good lighting, and wear eye protection if you’re using solvents or compressed air. When disassembling, keep track of parts so reassembly is correct and safe.
How do you clean a rifle barrel without damaging the rifling?
Use a bore-safe cleaning rod with the correct caliber brush and bore patches that match your rifle’s bore size. Apply a bore solvent to a patch and let it soak briefly, then run patches and a nylon or bronze bore brush in the correct direction (typically chamber-to-muzzle) to avoid unnecessary wear. After cleaning, dry the bore thoroughly and apply a light protective oil to prevent rust.
How do you clean the bolt carrier group and remove carbon buildup?
Strip the bolt carrier group according to your rifle’s manual, then use a quality solvent and nylon brushes to lift carbon from the bolt face, locking lugs, and rails. Pay special attention to the extractor and firing pin area, and avoid aggressive scraping that could damage metal surfaces. Wipe everything clean, then apply a thin film of gun oil to moving contact points—too much oil can attract fouling.
Which cleaning products are best for different rifle fouling types?
For typical powder residue, a general gun solvent and nylon brushes work well, while carbon-heavy buildup often benefits from a stronger carbon-removing solvent and targeted soaking on parts. Copper fouling may require a copper-specific bore cleaner and proper bore-patch cycles to avoid leaving abrasive deposits. For rust prevention after cleaning, use a quality gun oil or corrosion inhibitor rated for firearms.
Why should you clean your rifle after every range session?
Cleaning a rifle after shooting helps remove powder residue, carbon buildup, and moisture that can cause corrosion and reliability issues. Even if accuracy doesn’t noticeably drop right away, fouling can increase friction and affect function over time, especially in the bolt, chamber, and bore. A consistent rifle cleaning routine improves long-term performance, reduces the chance of stuck parts, and helps you spot wear early.
📅 Last Updated: November 09, 2026 | Topic: how to clean a rifle | Content verified for accuracy and freshness.
References
- Firearm maintenance
- https://armypubs.army.mil/epubs/DR_pubs/DR_a/pdf/web/fm3_22x9.pdf
- https://pubmed.ncbi.nlm.nih.gov/?term=firearm+cleaning+lead
- Lead in the Workplace | Lead | CDC
- https://www.cdc.gov/lead/prevention/default.htm
- Lead poisoning
- Lead – Overview | Occupational Safety and Health Administration
- https://scholar.google.com/scholar?q=rifle+cleaning+procedure Google Scholar
- https://scholar.google.com/scholar?q=firearm+maintenance+lubrication+field+care Google Scholar
- https://scholar.google.com/scholar?q=gun+cleaning+lead+dust+exposure+controls Google Scholar
